
Never one to be magnet shy, I thought I would share with you the latest bit of magnetising I've done to allow one of the new joint kits to be either version. As an aside, I won't be doing a land speeder vengeance / darkshroud one as they really don't need magnetising to swap out. On to the tutorial, which comes in 3 parts:
1. Initial assembly and what doesn't need magnetising.
- Trim parts and assemble the model except for the parts unique to each variant. It's essential to ensure that the model is fit together nice and tightly (using elastic bands if need be) to enable push-fitting of some of the parts. Pay extra attention to the rear of the craft and the under-wing weapon pods.
- The following areas don't need magnetising necessarily unless you really want to and should push-fit in place providing the joins are tight enough: tail fin; main gun (rift cannon/lascannon/mega bolter); secondary weapons (heavy bolters/targetting systems) and wing weapons. (hurricane bolters/missiles)
- Also, don't forget not to glue in place either the part afront the clear canopy or the part behind (or both) until things are painted, else you won't be able to place the clear cockpit in place.


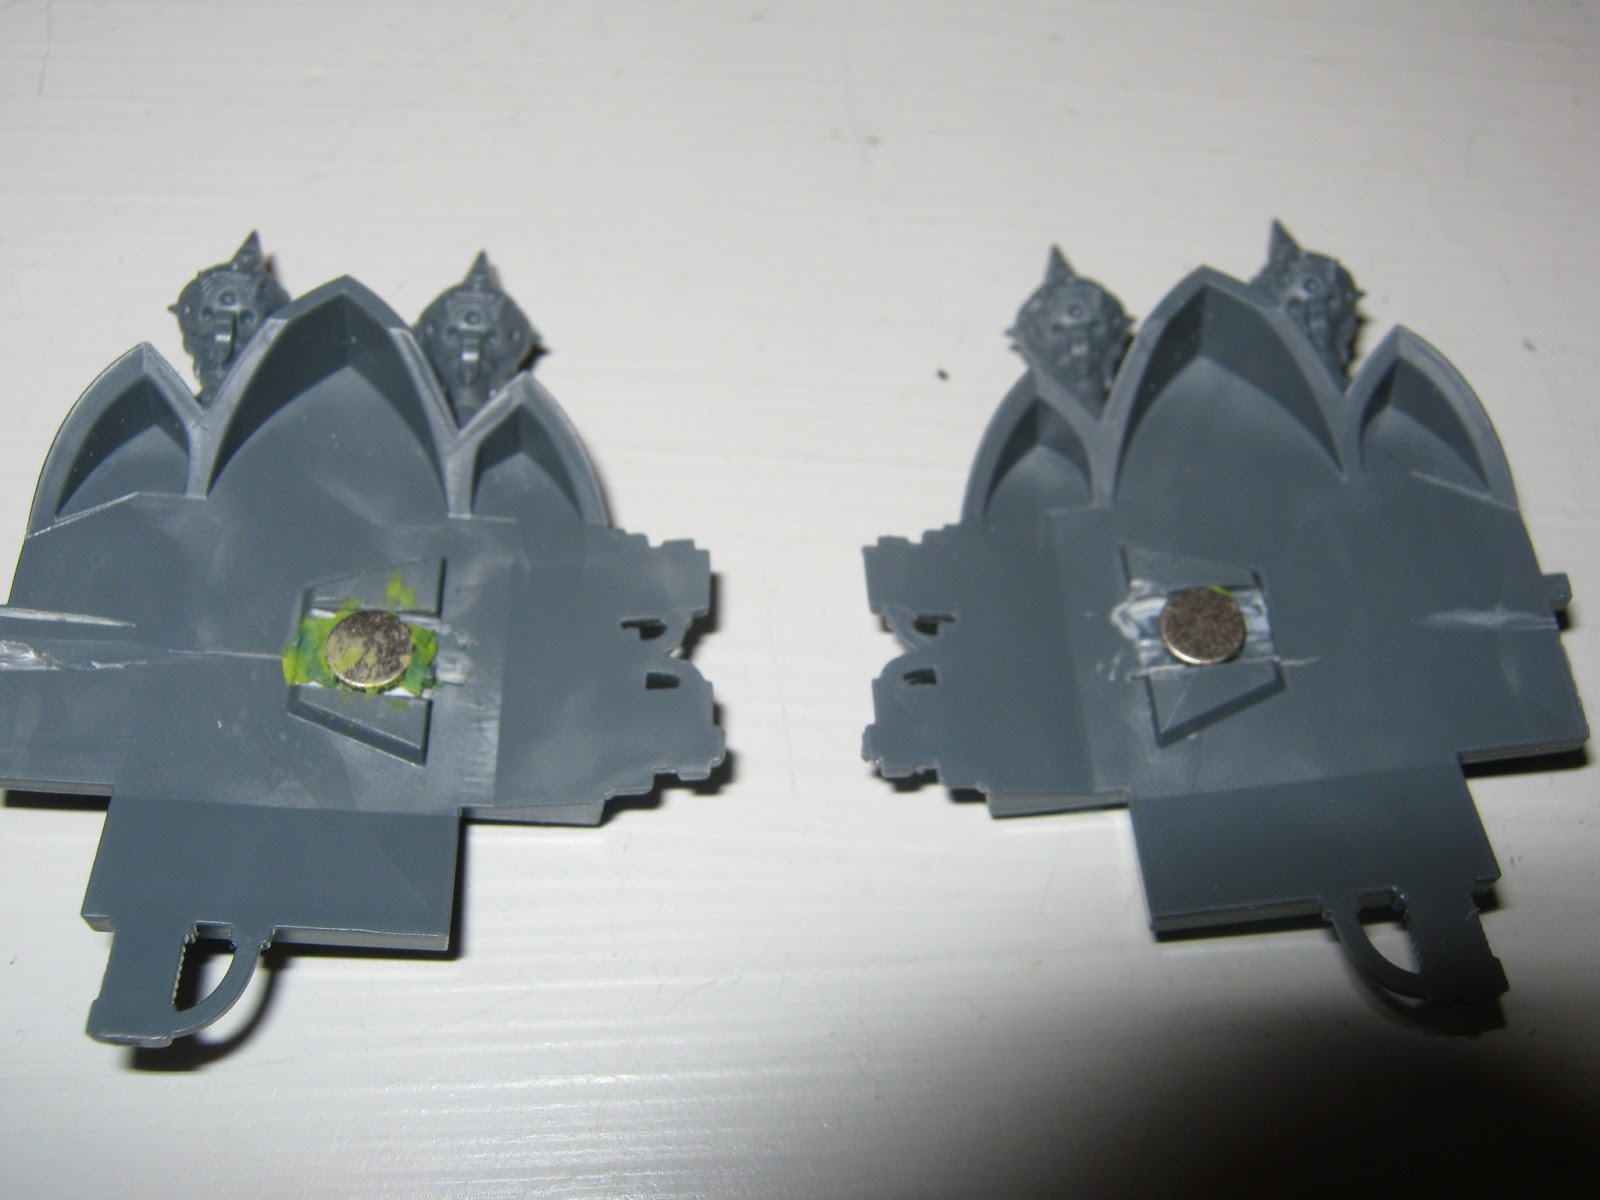
2. Magnetising the top of the vehicle.
- There are several ways to go about it but this is the way I came up with. I used two types of neodymium magnets: 0.5x3mm discs and 1.5x1mm rods. (which I will refer to as discs and rods respectively)
- Approximately in the middle of the side mounting points for the stasis crypt/antennae, superglue a disc on the interior of the craft, which should still be accessible through the roof.
- Place a disc magnet on the outside so it attaches to the magnet glued inside. You should be able to see where it needs to go on the stasis crypt/antennae.
- For the crypt, you will need to cut a groove out of the raised area in order to fit a disc magnet in. For the antennae, place some greenstuff inside the hole and push the disc magnet into it.
- Moving onto the roof, I placed two disc magnets inside; one on the edge of the attachment point (A) and the other pushed onto a bit of sprue (which was attached to the side attachment points) using some green stuff in order to compensate for any height difference. (B)
- The nephilim roof (A) needed a bit of sprue with a disc magnet on - best to glue the magnet to the bit of sprue, match the two magnets up then use some green stuff to attach the magnet/sprue to the roof.
- The Dark Talon roof needed a bit of plastic trimming (as magnet A gets in the way). Place a disc magnet atop the other magnet (B) and then simply put a dot of glue on it before placing the roof on top - ensure you line it up correctly or else the magnet will go on wonky.


3. The undercarriage
- Drill a hole into the middle of the three grooves on the rear stasis bomb attachment point on both the bomb and the corresponding undercarriage. Glue a rod magnet in the bomb so it is flush to the rest of the grooves. Place another rod magnet on the one glued in place, pop a blob of superglue on it and push it into the undercarriage so that both parts now have a magnet in corresponding places.
- Drill a hole in the centre of each of the vector jet mounting points. Glue a rod magnet into each so that they are flush with the surface.
- For the Dark Talon, simply drill a hole through each vector jet, place a rod magnet on each of the magnets from step 2, put a blob of superglue on them then push the vector jets on, leaving the magnet glued in the hole.
- For the nephilim, put a blob of greenstuff on each side of the heavy bolter hoppers. Place a disc magnet atop the rod magnets already on the hull (make sure they are centered) then push the ammo hoppers in place. This should leave the disc magnets embedded in the green stuff in the correct place.


That's pretty much it. As always, any questions please leave a comment or email me. Cheers.


Although I am not sure if I will field mine due to the poor rules, I was wondering how I would magnetize this guy. Thanks for the help.
ReplyDeleteThanks for sharing - I was planning on magnetizing the weapons but not the other aesthetic elements, I'll give it a try.
ReplyDeleteWhere in nz did you source the magnets from? Im looking at magnestising mine and want to pick up the right type/size. Cheers! :)
ReplyDeleteHi,
ReplyDeleteI use guys magnets on EBay UK and have done for years now. The sizes are 0.5x3mm discs and 1.5x1mm rods. They should be sourcable from the web or hobby stores. All the best.
Hey Jimbo,
ReplyDeleteJust wanted to say thank you for sharing your method, I used your advice this weekend to magnetise my Dark Talon!
Still helping hobbits in 2019!!!
FB